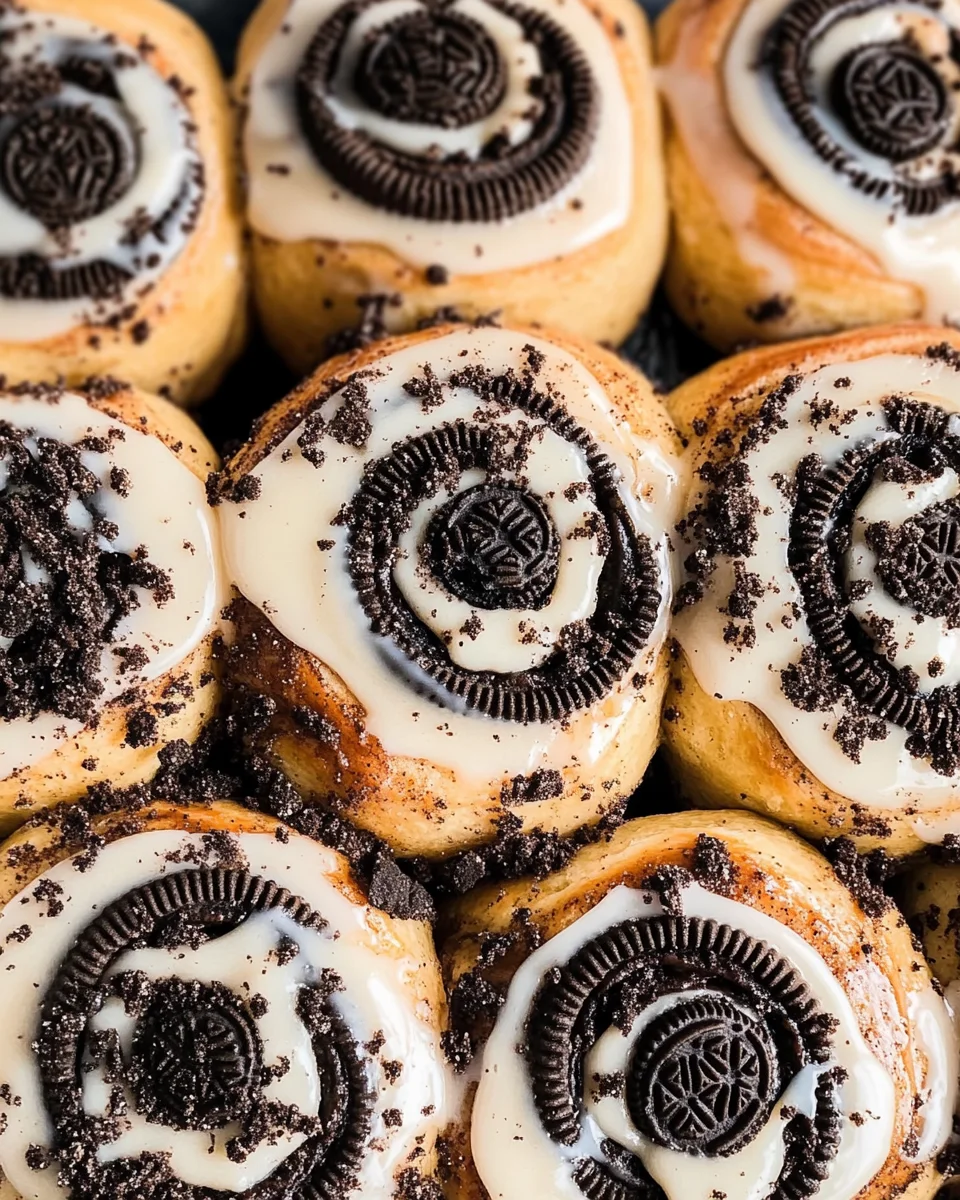
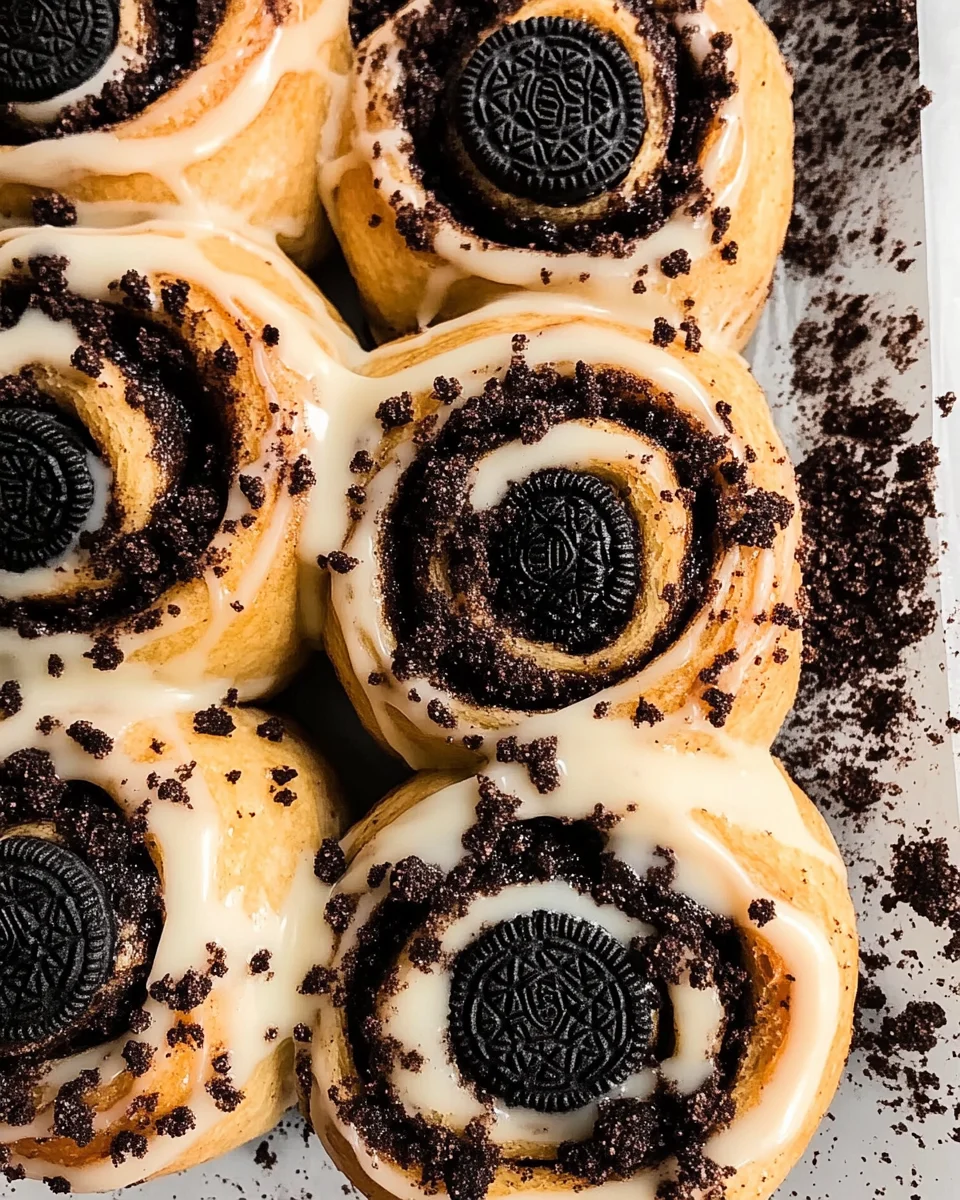
Oreo Cinnamon Rolls
These Oreo Cinnamon Rolls are the ultimate treat for any occasion! Their dark chocolate Oreo filling and delightful vanilla glaze create a unique flavor combination that is both indulgent and comforting. Perfect for brunch, dessert, or just a sweet afternoon snack, these rolls are sure to impress family and friends. With their soft texture and rich taste, they stand out from traditional cinnamon rolls, making them a must-try recipe.
Why You’ll Love This Recipe
- Delicious Flavor: The combination of Oreo cookies and cinnamon creates a mouthwatering treat that everyone will love.
- Easy Preparation: You can whip up these rolls in no time, making them ideal for both novice and seasoned bakers.
- Versatile Serving Options: Enjoy them warm for breakfast or as a dessert with coffee—perfect for any time of day.
- Impressive Presentation: These rolls look stunning on any table, making them great for special occasions or gatherings.
- Customizable Ingredients: Feel free to add extra toppings or fillings according to your taste preferences.
Tools and Preparation
Before diving into this delectable recipe, gather your tools to ensure a smooth baking experience.
Essential Tools and Equipment
- Rolling pin
- Mixing bowls
- Measuring cups and spoons
- Baking dish (9×13 inch)
- Whisk
Importance of Each Tool
- Rolling pin: Essential for rolling out the dough to the right thickness for perfect cinnamon rolls.
- Mixing bowls: Use different sizes for mixing dough and preparing fillings; having multiple bowls helps keep your workspace organized.
- Baking dish: A quality baking dish ensures even cooking of your Oreo cinnamon rolls.
Ingredients
These Oreo cinnamon rolls are truly scrumptious! They’re made with a dark chocolate Oreo filling & are topped with a delicious vanilla glaze!!
For the Dough
- 1/2 cup packed light brown sugar (100g)
- 2 Tbsp black cocoa powder (12g)
- 1 tsp ground cinnamon (3g)
- 1/4 cup unsalted butter, softened – to be spread on the dough (56g)
- 3 1/2 cups all-purpose flour + up to 1/2 cup additional flour to be added later in process (440g-500g)
- 2 tsp or 1 packet instant dry yeast (7g, 1/4 oz.)
- 1 tsp fine salt (6g)
- 1 cup whole milk (240g)
- 1/2 cup granulated sugar (100g)
- 1 large egg, room temperature (56g)
For the Filling and Topping
- 1/2 cup crushed Oreos (50g)
- 1/4 cup unsalted butter, room temperature (56g)
- 1 Tbsp unsalted butter, room temperature (8g)
- 1 1/2 cups powdered sugar (188g)
- 2 Tbsp whole milk (30g)
- 1 tsp artificial vanilla extract (4g)
How to Make Oreo Cinnamon Rolls
Step 1: Prepare the Dough
In a large mixing bowl, combine the warm milk and yeast. Let it sit until foamy, about 5 minutes.
Step 2: Mix Dry Ingredients
In another bowl, whisk together flour, brown sugar, black cocoa powder, ground cinnamon, and salt.
Step 3: Combine Mixtures
Gradually add the dry ingredients into the yeast mixture. Add in the egg and softened butter. Mix until a dough forms.
Step 4: Knead the Dough
Transfer the dough onto a floured surface. Knead it for about 5-7 minutes until smooth. If sticky, gradually add more flour.
Step 5: Let It Rise
Place the kneaded dough into a greased bowl. Cover it with a towel and let it rise in a warm place until doubled in size—about 60 minutes.
Step 6: Prepare Filling
While the dough rises, mix together crushed Oreos with softened butter in a small bowl until well combined.
Step 7: Roll Out Dough
Once risen, punch down the dough. Roll it out on a floured surface into a rectangle about ¼ inch thick.
Step 8: Add Filling
Spread the Oreo filling evenly over the rolled-out dough.
Step 9: Roll Up
Starting from one end, carefully roll up the dough into a log shape. Cut into equal pieces—about nine rolls.
Step 10: Second Rise
Place cut rolls in a greased baking dish. Cover again and let rise until puffy—about another 30 minutes.
Step 11: Preheat Oven
While rolls are rising again, preheat your oven to 350°F (175°C).
Step 12: Bake Rolls
Bake for about 26 minutes or until golden brown.
Step 13: Make Glaze
In a bowl, whisk together powdered sugar, milk, and vanilla extract until smooth.
Step 14: Drizzle Glaze
Once baked rolls have cooled slightly, drizzle glaze over them before serving. Enjoy your delicious Oreo cinnamon rolls!
How to Serve Oreo Cinnamon Rolls
Serving Oreo cinnamon rolls can elevate your breakfast or dessert experience. Here are some creative ways to present these delightful treats.
With a Cup of Coffee
- Pairing them with a hot cup of coffee enhances the chocolate flavors and adds a comforting element to your morning routine.
Drizzled with Extra Glaze
- For those who love sweetness, drizzle extra vanilla glaze on top to make each bite even more indulgent.
Topped with Whipped Cream
- Adding a dollop of whipped cream can transform your Oreo cinnamon rolls into a decadent dessert, perfect for special occasions.
Served Warm
- Enjoy them fresh out of the oven while they’re still warm. The gooey filling and soft dough are irresistible!
Alongside Fresh Fruit
- Serving with fresh fruit like strawberries or bananas offers a refreshing contrast to the rich flavors of the rolls.
How to Perfect Oreo Cinnamon Rolls
Perfecting your Oreo cinnamon rolls can take them from good to unforgettable. Here are some tips for achieving that ideal texture and flavor.
-
Use Fresh Ingredients: Ensure your yeast is fresh for proper rising. Expired yeast can lead to dense rolls.
-
Knead Properly: Knead the dough until it’s smooth and elastic. This helps develop gluten, giving your rolls the right structure.
-
Don’t Skip the Rising Time: Allow ample time for the dough to rise. This step is crucial for fluffy cinnamon rolls.
-
Adjust Flour as Needed: Depending on humidity, you may need slightly more flour. Add it gradually until the dough isn’t sticky.
Best Side Dishes for Oreo Cinnamon Rolls
Oreo cinnamon rolls pair wonderfully with various side dishes that can complement their sweet flavors. Here are some great options:
-
Fresh Orange Juice: A glass of freshly squeezed orange juice adds a refreshing citrus note that balances the sweetness.
-
Bacon or Sausage Links: The savory elements of bacon or sausage provide a nice contrast to the sweet rolls.
-
Yogurt Parfait: Layering yogurt with granola and berries creates a light and healthy side that pairs well with rich cinnamon rolls.
-
Fruit Salad: A colorful fruit salad offers freshness and natural sweetness, making it an ideal companion.
-
Scrambled Eggs: Creamy scrambled eggs add protein and richness, making your breakfast more satisfying.
-
Hash Browns: Crispy hash browns provide a crunchy texture that complements the soft cinnamon rolls beautifully.
-
Smoothie Bowl: A smoothie bowl topped with nuts and seeds can be a nutritious side that balances indulgence with healthfulness.
-
Chia Seed Pudding: This light dessert option provides fiber and nutrition, making it a great match for sweet treats like Oreo cinnamon rolls.
Common Mistakes to Avoid
Making Oreo cinnamon rolls can be a fun and rewarding experience, but it’s easy to make mistakes along the way. Here are some common pitfalls and how to avoid them.
- Incorrect yeast temperature: Using water that is too hot or too cold can kill the yeast. Always use warm water, around 110°F (43°C), for optimal activation.
- Overmixing the dough: Mixing the dough too much can lead to tough rolls. Mix just until combined for a light and fluffy texture.
- Not letting dough rise: Skipping the rising time can result in dense rolls. Allow your dough to rise until it doubles in size for best results.
- Inconsistent baking time: Every oven is different. Keep an eye on your rolls while baking and use a toothpick to check doneness.
- Skipping the glaze: The vanilla glaze adds extra flavor and moisture. Don’t skip this step if you want deliciously sweet rolls!
Storage & Reheating Instructions
Refrigerator Storage
- Store leftover Oreo cinnamon rolls in an airtight container.
- They will stay fresh for up to 3 days in the refrigerator.
Freezing Oreo Cinnamon Rolls
- Place unbaked rolls in a freezer-safe container or wrap tightly in plastic wrap.
- They can be frozen for up to 3 months. Allow them to thaw in the fridge overnight before baking.
Reheating Oreo Cinnamon Rolls
- Oven: Preheat your oven to 350°F (175°C). Wrap the rolls in foil and heat for about 10-15 minutes until warm.
- Microwave: Warm individual rolls on a microwave-safe plate for about 20-30 seconds. Be cautious not to overheat as they can become tough.
- Stovetop: Place a small amount of water in a skillet, cover with a lid, and steam for about 5 minutes on low heat for soft rolls.
Frequently Asked Questions
What are Oreo Cinnamon Rolls?
Oreo cinnamon rolls are sweet, fluffy rolls filled with crushed Oreos and a delightful blend of cocoa powder and cinnamon, topped with a rich vanilla glaze.
Can I make these Oreo Cinnamon Rolls ahead of time?
Yes! You can prepare the dough and filling ahead of time. Just store them in the refrigerator or freezer until you’re ready to bake.
What if I don’t have black cocoa powder?
You can substitute regular cocoa powder if needed, but black cocoa gives these Oreo cinnamon rolls their unique flavor and color.
How do I customize my Oreo Cinnamon Rolls?
Feel free to add other mix-ins like chocolate chips or nuts for added texture and flavor. You can also try different glazes like cream cheese or chocolate!
Final Thoughts
These Oreo cinnamon rolls are not only delicious but also versatile enough to suit various tastes. Whether you enjoy them as a dessert or brunch treat, they are sure to impress your family and friends. Don’t hesitate to experiment with flavors or toppings; the possibilities are endless!
Oreo Cinnamon Rolls

Indulge in the delightful world of Oreo Cinnamon Rolls – a perfect blend of your favorite chocolate cookie and classic cinnamon roll. These scrumptious treats are filled with crushed Oreos and drizzled with a rich vanilla glaze, creating a unique flavor that is both comforting and decadent. Whether you’re serving them for brunch or as an after-dinner dessert, these rolls are guaranteed to impress everyone at your table. Their soft texture combined with the sweet chocolatey filling makes them irresistible. Plus, they are easy to prepare, making them a must-try recipe for bakers of all skill levels!
- Prep Time: 30 minutes
- Cook Time: 26 minutes
- Total Time: 56 minutes
- Yield: Approximately 9 servings 1x
- Category: Dessert
- Method: Baking
- Cuisine: American
Ingredients
- 1/2 cup light brown sugar
- 3 1/2 cups all-purpose flour
- 2 tsp instant dry yeast
- 1 cup whole milk
- 1 large egg
- 1/2 cup crushed Oreos
- 1 1/2 cups powdered sugar
Instructions
- In a large mixing bowl, combine warm milk and yeast; let it sit until foamy (about 5 minutes).
- In another bowl, whisk together flour, brown sugar, cocoa powder, cinnamon, and salt.
- Add dry ingredients to the yeast mixture along with the egg and softened butter; mix until a dough forms.
- Knead the dough on a floured surface for about 5-7 minutes until smooth.
- Place in a greased bowl, cover, and let rise in a warm place until doubled (about 60 minutes).
- Prepare filling by mixing crushed Oreos with softened butter.
- Roll out dough into a rectangle, spread filling evenly, roll up tightly, cut into pieces.
- Place rolls in a greased baking dish; let rise again (about 30 minutes).
- Preheat oven to 350°F (175°C) and bake for approximately 26 minutes until golden brown.
- Make glaze by whisking together powdered sugar, milk, and vanilla extract; drizzle over warm rolls before serving.
Nutrition
- Serving Size: 1 roll (80g)
- Calories: 280
- Sugar: 18g
- Sodium: 220mg
- Fat: 10g
- Saturated Fat: 6g
- Unsaturated Fat: 4g
- Trans Fat: 0g
- Carbohydrates: 43g
- Fiber: 2g
- Protein: 4g
- Cholesterol: 40mg